
 |
| The Battle of Camperdown - Derek Gardner. Left to Right, Circe 28-guns, Powerful 74-guns, Bedford 74-guns, Hercules 64-guns, Triumph 74-guns, Belliqueux 64-guns, Ardent 64-guns, De Vries 68-guns, Vrijheid 74-guns, Venerable 74-guns, Staten Generaal 74-guns. Depicted are the three 74's of the British Windward Division including Admiral Duncan's flagship, HMS Venerable 74-guns, seen here broadside to broadside with the Batavian Flagship Vrijheid flying signal flag number five together with a red pennant, 'Engage the Enemy Closely' at her mizzen and Admiral Duncan's blue flag at the main. |
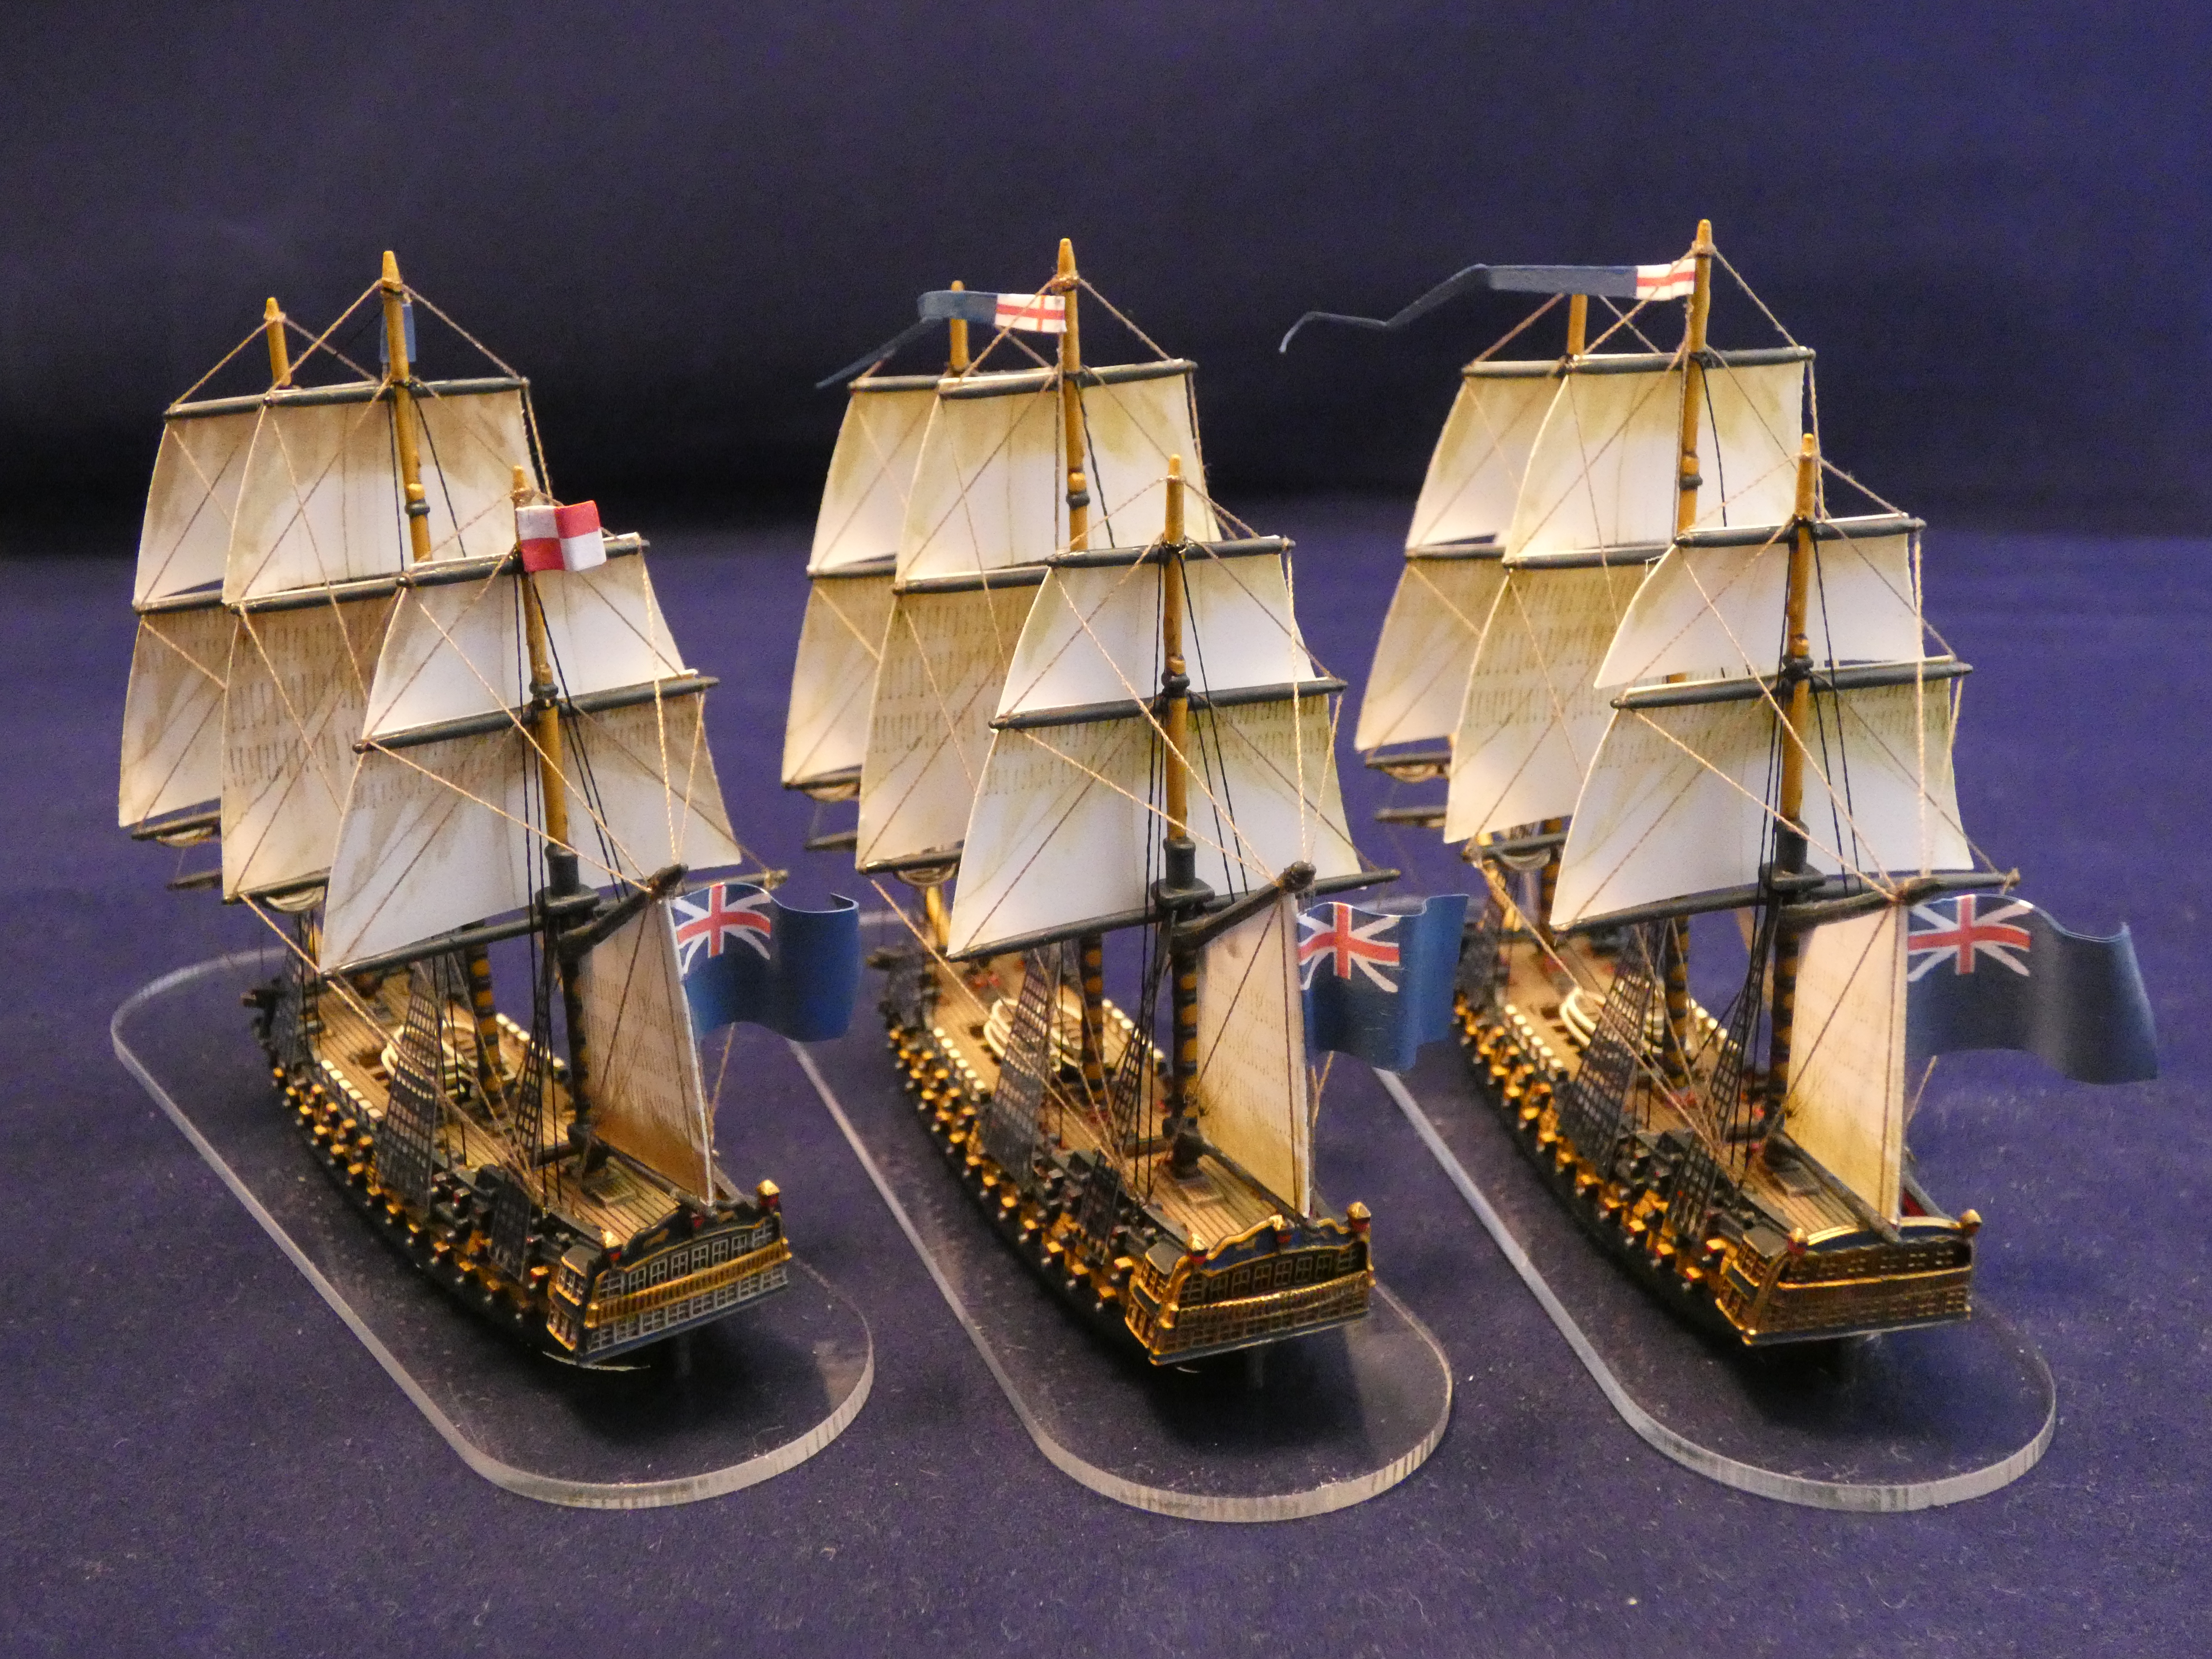
Progress with the Camperdown collection continues apace with work now progressed to the completion of the British Windward Division led by the commander of the British fleet as a whole, Admiral of the Blue, Adam Duncan; and in this post I focus on the three ships that spearheaded the attack of this portion of the British fleet, namely the three British 74-gun ships of the line, HMS Venerable, Triumph and Bedford, whilst also looking at the man who commanded them.
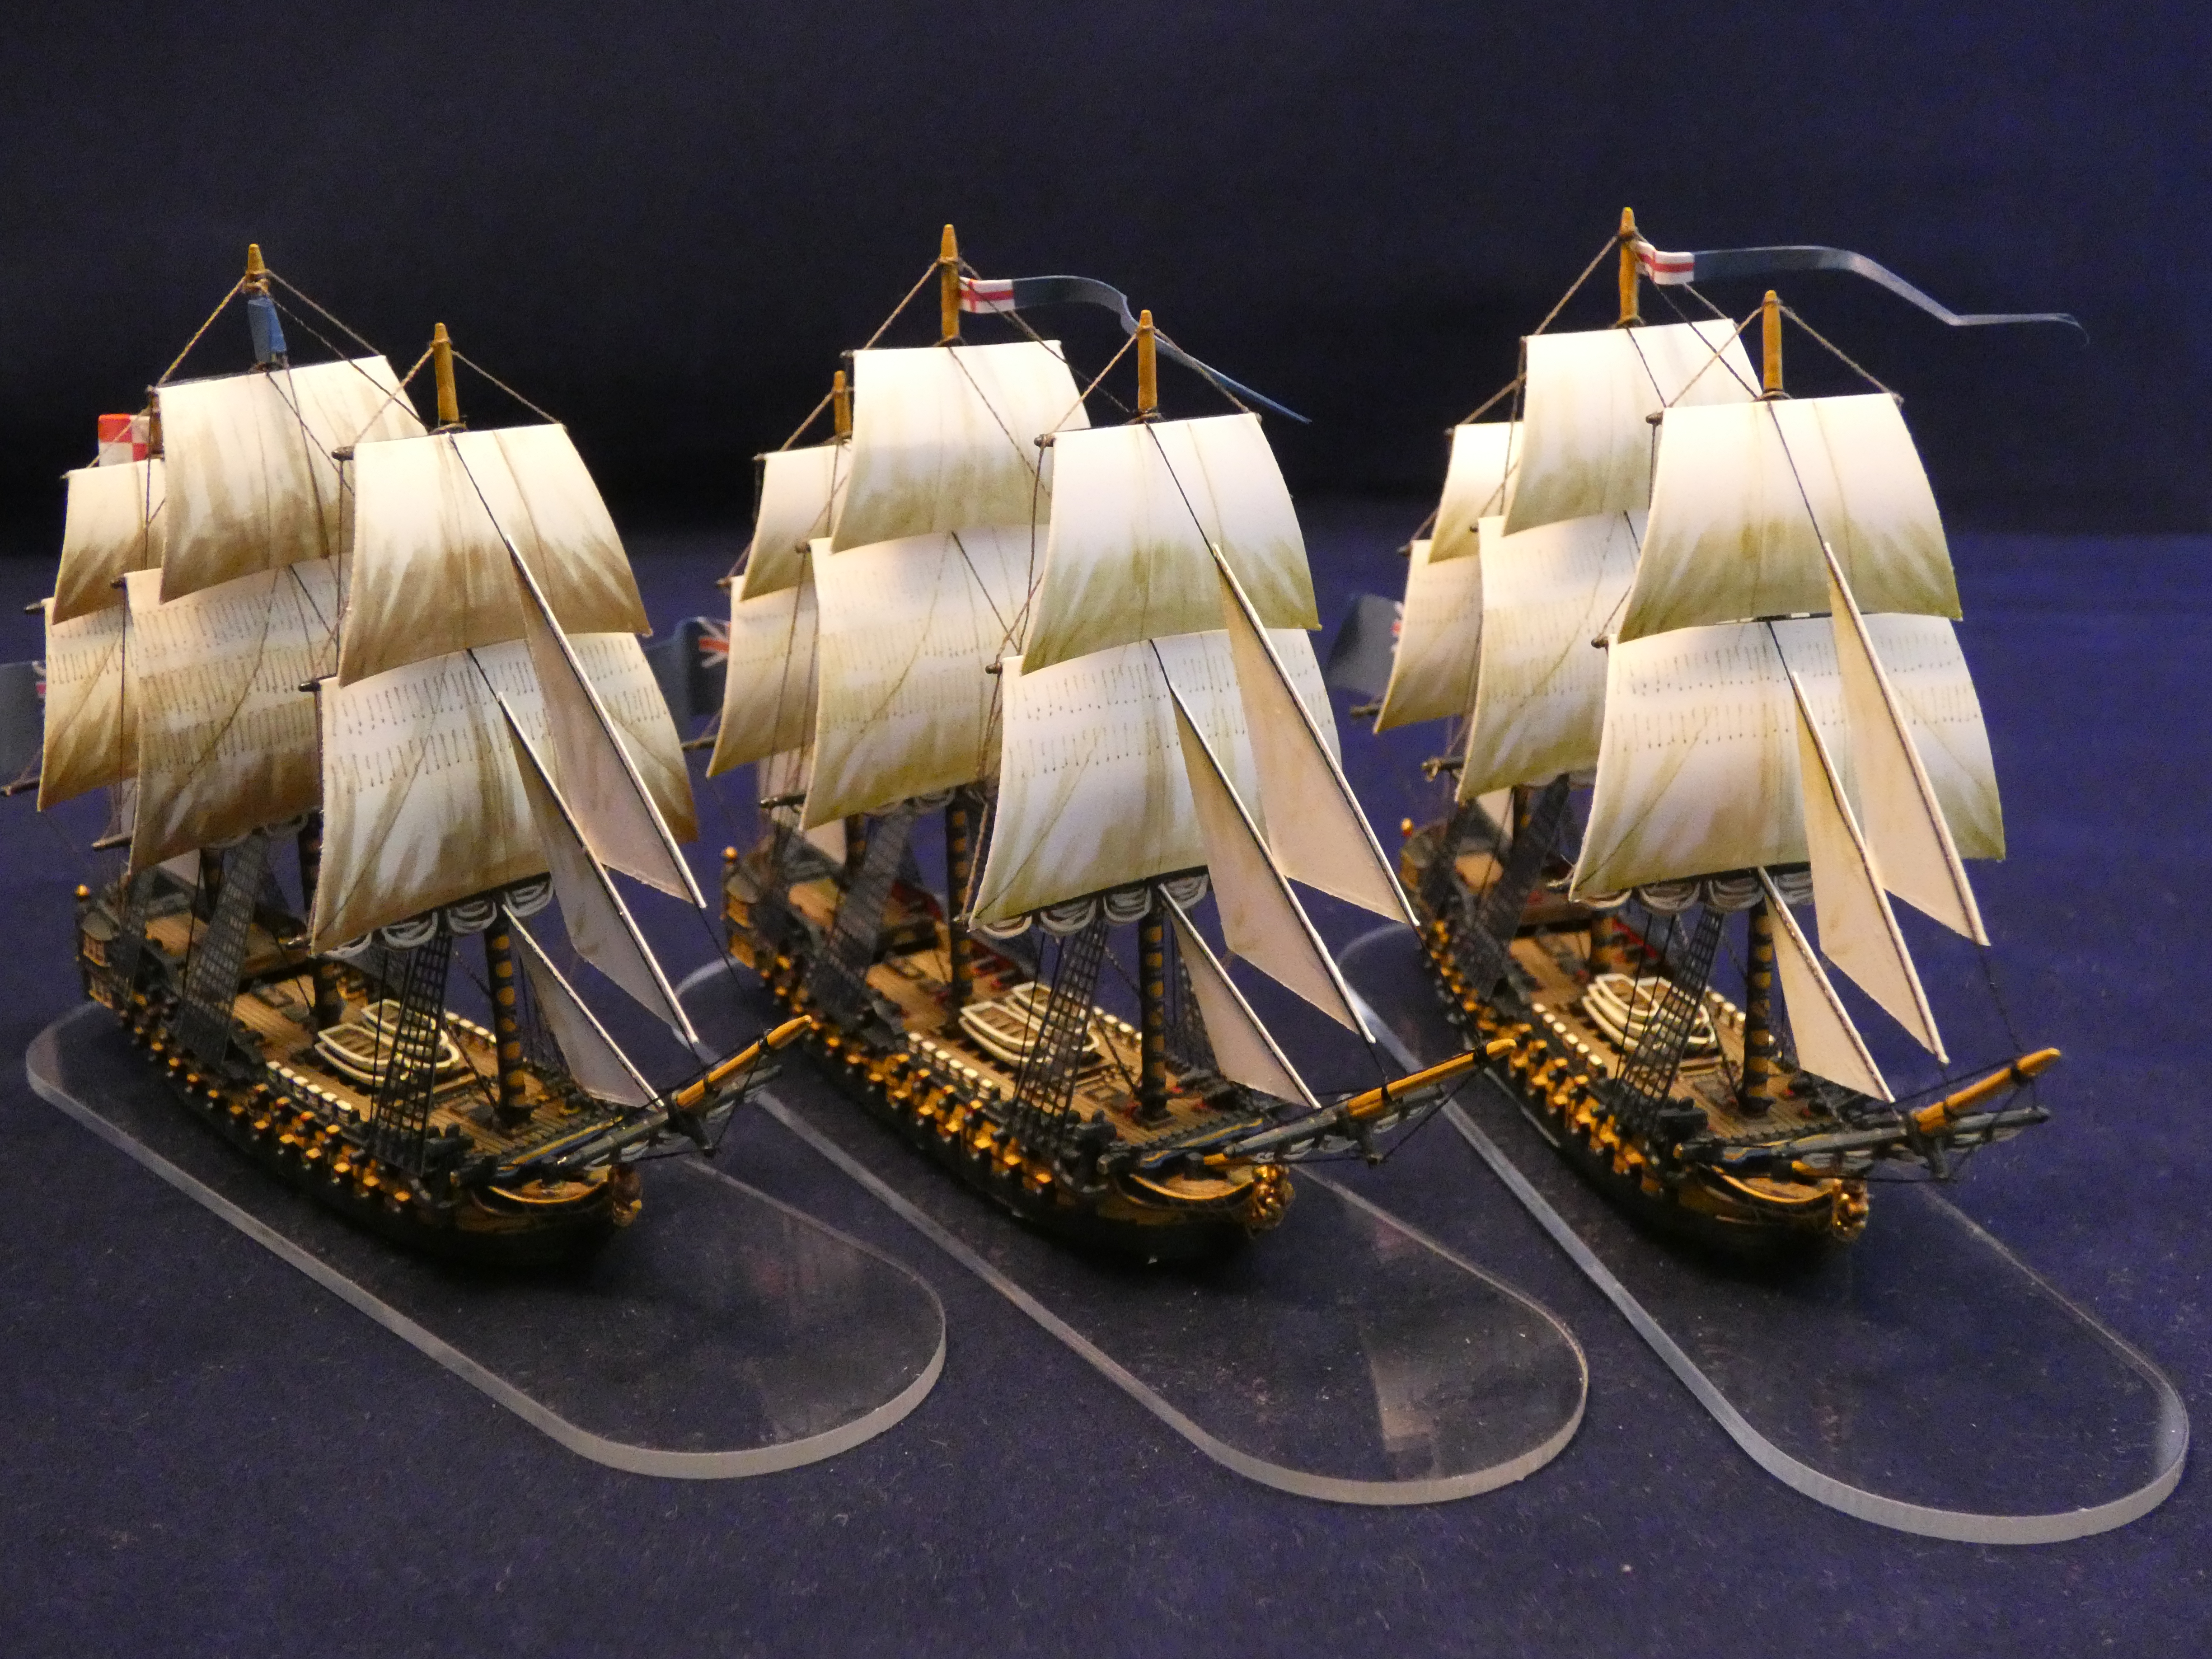 |
| The three British 74-gun ships of the line, recently added to the collection (left to right) HMS Venerable, Triumph and Bedford, |
In addition with this post looking at the commander of the British fleet, I thought I might as well look at the key events that led up to the Battle of Camperdown and the way Duncan fought the battle.
Admiral of the Blue, Adam Duncan
Admiral Duncan was born in Dundee, Scotland, in July 1731, into a landowning family, the Duncan's of Lundie, his father being the hereditary proprietor of an estate in south-west Angus.
 |
| Portrait of Adam Duncan, 1st Viscount Duncan (1731-1804) - John Hoppner Admiral of the Blue, Adam Duncan, led the British fleet that defeated the Batavian Dutch fleet at Camperdown, 11th October 1797. This portrait, circa 1798, shows him wearing the star and sash of the Russian Imperial Order of St. Alexander Nevsky, awarded to him by Tsar Paul I (1797). |
.jpg) |
| The Sloop HMS Trial, seen here in three positions off Antigua, circa 1764 - John Cleveley the Elder. |
In 1749, he was appointed to HMS Centurion, then commissioned for service in the Mediterranean, by the Hon. Augustus Keppel (afterwards Viscount Keppel) an officer at the age of twenty-four, who would have been described as 'on the way up' and who would become Duncan's key patron and with whom he was afterwards in HMS Norwich on the coast of North America, and was confirmed in the rank of lieutenant on the 10th January 1755. Indeed between 1749 and 1764 all of Duncan's naval service, with the exception of two brief spells, was under Keppel.
In August 1755, he followed Keppel to Swiftsure, and in January 1756 to Torbay, in which he continued until his promotion to commander's rank on the 21st September 1759, and during this time was present in the expedition to Basque Roads in 1757, at the reduction of Gorée in 1758, and in the blockade of Brest in 1759, up to within two months of the Battle of Quiberon Bay, from which his promotion just excluded him.
In August 1755, he followed Keppel to Swiftsure, and in January 1756 to Torbay, in which he continued until his promotion to commander's rank on the 21st September 1759, and during this time was present in the expedition to Basque Roads in 1757, at the reduction of Gorée in 1758, and in the blockade of Brest in 1759, up to within two months of the Battle of Quiberon Bay, from which his promotion just excluded him.
 |
| Commodore the Honourable Augustus Keppel, 1749 - Joshua Reynolds |
 |
| The Capture of Havana: Taking the Town, 14th August 1762 - Dominic Serres |
He returned to Britain in 1763, having been weakened from illness after service in the West Indies and, notwithstanding his repeated request, had no further employment for many years, during which time he was rewarded with £1,600 in prize money from his service in the Cuban expedition and he married Henrietta Dundas, daughter of Robert Dundas, President of the Scottish Court of Session and allying himself with a powerful Scottish legal dynasty.
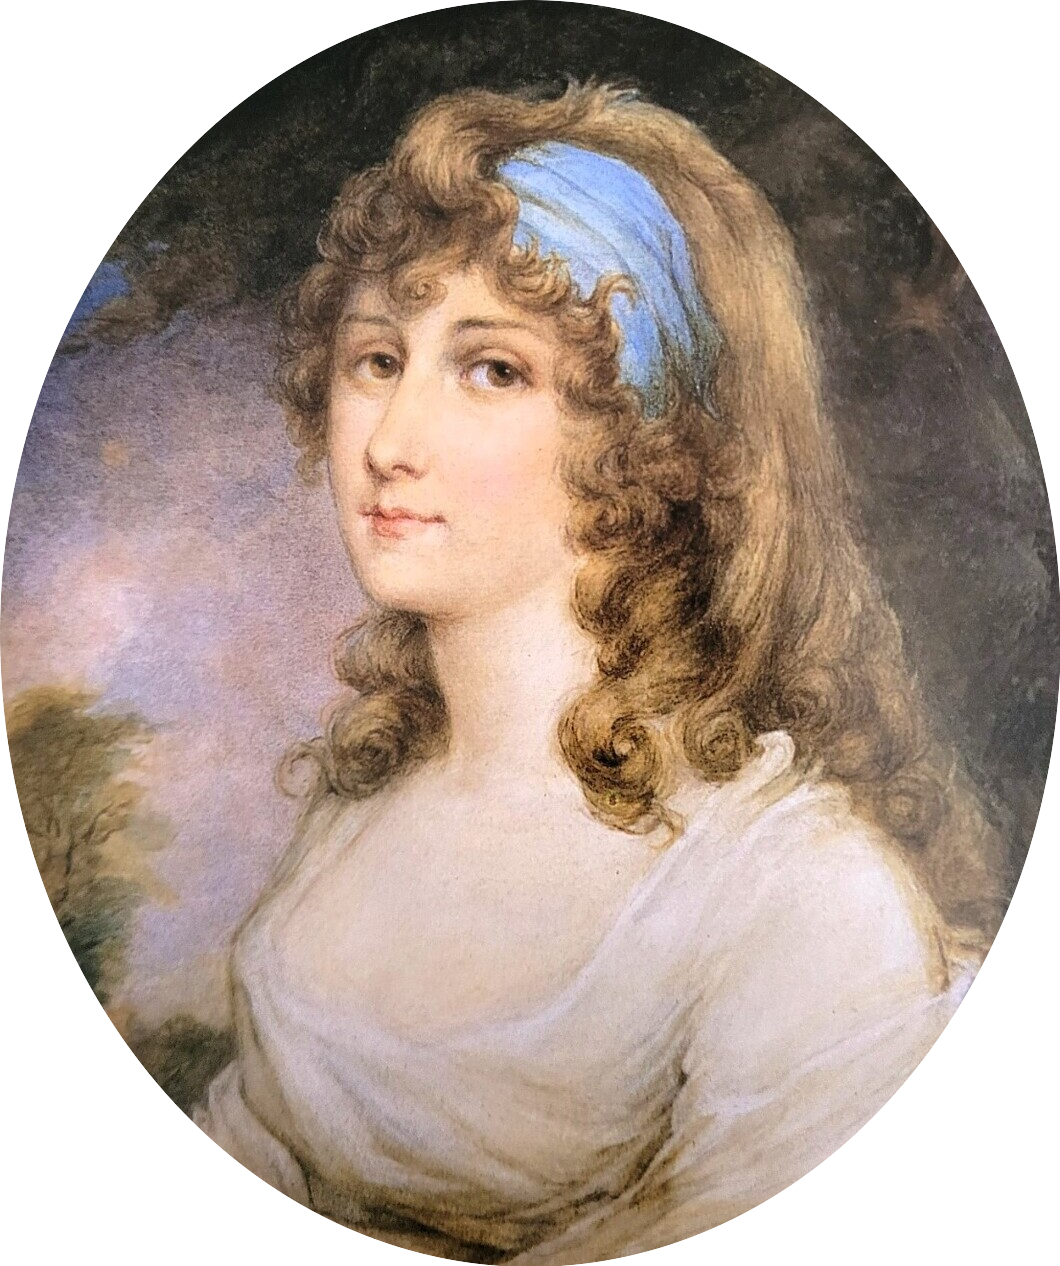 |
| Henrietta Dundas, daughter of Robert Dundas, married Adam Duncan in 1777, aged 27 or 28 when Duncan was 46. |
I covered the history of HMS Monarch in a previous post looking at this, the flagship of Duncan's deputy, Vice Admiral Richard Onslow, see link below.
 |
| HMS Monarch 74-guns JJ's Wargames - All at Sea, Battle of Camperdown, Project Build, Part Three, British 74's of the Leeward Division |
In January 1779, he sat as a member of the court-martial of Admiral Keppel and Sir Hugh Palliser for the poor performance of the Channel Fleet during the First Battle of Ushant. Both men were cleared but Keppel resigned his commission, refusing to serve under the hostile Tory administration of Lord North's government.
 |
| The Moonlight Battle off Cape St Vincent, 16 January 1780 - Richard Paton Captain Adam Duncan was in command of HMS Monarch which suffered the highest number of casualties among the British ships engaged (29 including 3 killed) in the night time battle. |
On returning to Britain, Duncan quit Monarch, after his ship was posted to the Caribbean, which he had been advised to avoid returning to on medical grounds, and had no further command until after the change of Ministry in March 1782, when Keppel became first lord of the admiralty. He was then appointed to HMS Blenheim of 90 guns, and commanded her during the year in the Grand Fleet under Howe, at the relief of Gibraltar in October, and the encounter with the allied fleet off Cape Spartel. He afterwards succeeded Sir John Jervis in command of Foudroyant, and after the peace commanded HMS Edgar as guardship at Portsmouth for three years.
He attained flag rank on 24 September 1787, became vice admiral on the 1st of February 1793, and was promoted to admiral on the 1st of June 1795. In February 1795, he was appointed Commander-in-Chief, North Sea, and hoisted his flag on board HMS Venerable.

One on Duncan's captains who served with him at Camperdown recorded the following pen-portrait of the man;
'Lord Duncan was a remarkably fine man in his person, and though impetuous in his temper, exceedingly good natured. He kept very little state either in his establishment or his person, and lived in a very frugal manner. He was however always cheerful and kind at his Table.'
Mutiny in the Fleet
On the 16th of April 1797 sailors on sixteen ships in the Channel Fleet, commanded by Admiral Lord Bridport, protested against the living conditions aboard Royal Navy vessels and demanded a pay rise, better victualling, increased shore leave, and compensation for sickness and injury; and on the 26th of April a supportive mutiny broke out on fifteen ships in Plymouth, who sent delegates to Spithead to take part in negotiations.
 |
| The Delegates in Council. A contemporary cartoon of the delegation of sailors who devised the terms of settlement of the Nore Mutiny, 1797. Richard Parker is depicted extreme right |
Richard Parker was elected "President of the Delegates of the Fleet". According to him, he was nominated and elected without his knowledge. Parker was a former master's mate who was disrated and court-martialled in December 1793 and re-enlisted in the Navy as a seaman in early 1797, where he came to serve aboard the brig-sloop Hound.
 |
| Richard Parker "President of the Delegates of the Fleet", later convicted of treason and piracy by a court martial following the mutiny and hanged from the yardarm of HMS Sandwich |
Demands were formulated and on the 20th of May 1797, a list of eight demands was presented to Admiral Charles Buckner, which mainly involved pardons, increased pay and modification of the Articles of War, eventually expanding to a demand that the King dissolve Parliament and make immediate peace with France. These demands infuriated the Admiralty, which offered nothing except a pardon (and the concessions already made at Spithead) in exchange for an immediate return to duty.
With threats to blockade London and deliver up ships to France, the government's attitude hardened taking steps to deny the mutineers food and water and when Captain Cunningham of the frigate HMS Clyde persuaded his crew to return to duty and slip away to Sheerness this was seen as a signal for other ships crews to do likewise and the mutiny collapsed with Parker's own ship, HMS Sandwich the last to capitulate on June 14th leaving the key ringleaders facing death or transportation at the court-martials that followed.
During the month long mutiny Duncan was left with only his own Venerable and Captain William Hotham's 50-gun Adamant to contain the entire Dutch fleet. Duncan later wrote that,
On the 10th of June, six more ships joined Duncan's squadron from the Channel Fleet, and, on the 13th of June, a Russian squadron arrived. While Duncan had been at sea, the Nore Mutiny had acrimoniously fallen apart under blockade by government forces.
 |
| ‘Escape of HMS Clyde from the Nore Mutiny’ (1830), by William Joy |
"To be deserted by my own fleet in the face of the enemy is a disgrace which I believe never before happened to a British admiral, nor could I have supposed it possible."
Aware that the escape of the Dutch fleet into the North Sea at such a vulnerable time could be disastrous for Britain, Duncan maintained his position off the Texel for three days, during which the wind was ideal for a Dutch foray, and he disguised his two vessels as different ships on each day and ordered the frigate HMS Circe to make a flurry of nonsensical signals to a fictitious British fleet beyond the horizon.
He was subsequently joined by two additional ships, HMS Russell and Sans Pareil, and on the fourth day, with conditions still perfect for the Dutch, he anchored his squadron in the Marsdiep Channel and gave orders for them to fight until their ships sank, thereby blocking the channel. In a speech to his men, he announced that;
"The soundings are such that my flag will continue to fly above the water after the ship and her company have disappeared".
The expected attack never came: the Dutch army that was to have joined the fleet was not prepared, and Duncan's misleading signals had successfully convinced De Winter that a large British fleet waited just beyond the horizon.
By the middle of August 1797, after six weeks of constant easterly winds that kept his ships trapped in their harbour, the Dutch Admiral De Winter decided that an attempt to join the French at Brest as the first stage of an invasion of Ireland was impractical and he abandoned the plan.
In part this decision was due to the strength of Duncan's reconstituted fleet, which had increased to seventeen ships of the line with the addition of the vessels returned from the Nore. Duncan's men were also better trained and more experienced than their Dutch counterparts, having spent considerably longer at sea and having been taught to fire three rounds a minute to the Dutch two. In addition to his concerns about the proficiency of his men, De Winter was also worried about their loyalty: the dominion of France over the Batavian Republic and the country's enforced participation in distant theatres of warfare were unpopular among the Dutch people, and support for the House of Orange remained strong among the Dutch population and with the fleet's sailors.
 |
| Theobald Wolfe Tone, 20 June 1763 – 19 November 1798), was a revolutionary exponent of Irish independence |
Wolfe Tone wrote in frustration that;
"The destiny of Europe might have been changed for ever . . . the great occasion is lost, and we must do as well as we can."
When news of this decision reached the Admiralty, they recalled Duncan's blockade fleet to Yarmouth for a refit on the 1st of October but Duncan took the precaution to order some of his ships back to the Dutch coast under the command of Captain Henry Trollope in HMS Russell, accompanied by HMS Adamant and the small ships HMS Beaulieu, Circe and Martin with the hired armed cutter Black Joke.


For my model I garnered much inspiration from the 1/10th scale model of HMS Venerable at Sunderland Maritime Heritage, including my own sculpted version of 'The Venerable Bede' for her figurehead.
Their arrival off Texel on the 6th of October coincided with Admiral De Winter's decision to take his fleet to sea, following the abandonment of the earlier plan.
 |
| Laurie and Whittle Map of Holland 1794 showing the Texel Naval Base and the coastline off which the Battle of Camperdown was fought on the 11th October 1797 |
Their long stay in port had done nothing to improve Dutch sailing proficiency and practice at operating as a fleet, and thus De Winter had reluctantly acceded to orders from the Batavian government to conduct a brief sweep in the Southern North Sea in search of weak British forces that could be overwhelmed by his fleet or drawn into the dangerous shallow waters of the Dutch coastline. He may also have been hoping to resurrect the plan to augment the French at Brest if he was able to pass westwards down the English Channel undetected.
His fleet consisted of sixteen ships of the line and a number of smaller support craft, and his orders from The Hague included instructions to remember;
"how frequently Dutch Admirals have maintained the honour of the Dutch flag, even when the enemy's forces were sometimes superior to theirs".
The Dutch did not manage to leave the Texel until 10:00 on the 8th of October, De Winter turning southwest in the hope of linking with another Dutch ship of the line at the mouth of the River Maas and within hours, Trollope had discovered and followed De Winter.
The Dutch did not manage to leave the Texel until 10:00 on the 8th of October, De Winter turning southwest in the hope of linking with another Dutch ship of the line at the mouth of the River Maas and within hours, Trollope had discovered and followed De Winter.
The Dutch fleet was watched constantly by the ships Duncan had sent to observe them, and when Dutch preparations to sail were observed, a message was sent back to Duncan informing him of the Dutch movements.
 |
| H.M. armed cutter 'Active' firing a gun and making a signal to Admiral Duncan in Yarmouth Roads giving intelligence that the Dutch Fleet is at sea - Painting by H. Stretton |
The despatch vessel flew the signal for an enemy as it entered Yarmouth roads early in the morning on the 9th of October, so that by the time it had docked the British fleet was already preparing to sail, Duncan sending the final message to the Admiralty:
"The wind is now in the NE and [I] shall make good course over to them, and if it please God, hope to get at them. The squadron under my command are unmoored and I shall put to sea immediately."
Before midday, Duncan had sailed with the eleven ships that were ready and steered for the mouth of the Texel, intending to intercept De Winter on his return. By evening his fleet was at full strength, three stragglers having rejoined, and on the afternoon of the 10th of October his ships were anchored off the Dutch port, scouts reporting twenty-two merchant ships in the harbour but no sign of De Winter's warships.
 |
| A representation by an unknown artist of the British and Dutch fleets five minutes before the action commenced on the 11th October 1797. |
Meanwhile, further messages from Trollope reporting the Dutch movements had reached Duncan and he turned his fleet west, following the Dutch coastline. At 07:00 on the morning of the 11th of October Trollope's squadron sighted sails to the northeast and, after confirming that they were Duncan's fleet, signalled that the Dutch fleet was approximately three nautical miles (5.6 km) further to the southwest, becoming visible to the fleet by 08:30.

The first clear sighting was reported by Captain Peter Halkett of Circe, who had climbed the mainmast to get a better view. At this point, the Dutch were sailing towards land, approximately nine nautical miles (17 km) off the coast of North Holland, close to the village of Camperduin. The weather was poor, with heavy seas and strong wind from the southeast broken by frequent rain squalls, but this did not prevent hundreds of Dutch civilians gathering on the dunes to watch the impending combat.

Sir William Laird Clowes recounts the fleets closing and the subsequent action in his History of the Royal Navy Vol IV Pages 327 - 329;
'At daylight on the 11th, the Dutch were about eighteen miles off Scheveningen in loose order. Soon afterwards, seeing Trollope's signals to windward, and knowing from them that his enemy was close at hand, De Winter ordered his captains to their stations, and, to facilitate the junction of his rearmost ships, stood towards the land.
When the nearest coast bore east, about twelve miles, he directed his fleet to haul to the wind on the starboard tack; and, as soon as he sighted Duncan in the north-west, he put about on the port tack, formed a close line from south-west to north-east, and, with main yards square, awaited the attack.

The British fleet, when first it had sight of the Dutch, was in very straggling order, chiefly owing to the unequal sailing of the ships. Duncan made his van ships shorten sail, and, at about 11.10 A.M., brought to on the port tack; but, observing a little later that the Dutch, who kept their main topsails now shivering and now full, were drawing in with the shore, he signalled in quick succession; for each ship to engage her opponent in the enemy's line; to bear up and sail large; and for the van to attack the enemy's rear.
At 11.30, when the centre of the Dutch line bore south-east, distant between four and five miles, the British bore down, still, however, in straggling, and, indeed, in somewhat confused order. At 11.53 a.m., Duncan signalled that he should pass through the enemy's line and engage from leeward; but, as the weather was thick, this signal was not generally taken in. At about 12.05 P.M. there was substituted for it the signal for close action.

It was about 12.30, when the Monarch, leading the larboard division of the British fleet, cut through the Dutch line between the Jupiter and the Haarlem, firing, as she did so, a broadside into each, and then luffing up alongside the Jupiter, while the Powerful, coming up, tackled the Haarlem.
To leeward of his line of battle, De Winter had stationed a subsidiary line of frigates and brigs; and two of these, the Monnikendam and the Daphne, each seized the opportunity of pouring a raking fire into Vice-Admiral Onslow's flagship as she rounded to.
Both the small craft suffered severely for their temerity in thus deliberately inviting attention from a ship of the line. Most of the other vessels of the British larboard division were close behind the leaders; and, in a very few minutes, the Dutch rear, with the exception of the three headmost ships
(Brutus Leijden and Mars) of it, was very closely engaged. Those three ships were exposed only to a more distant fire; and it was to some extent owing to this that they were subsequently able to attempt to succour De Winter, and that they ultimately escaped capture.
About eighteen minutes after the Monarch had broken the rear of the Dutch line, the Venerable, first endeavouring to pass astern of the Vrijheid, but being frustrated by the promptitude of the Staten Generaal in closing the interval, put her helm to larboard, and delivered such a broadside into the port quarter of Storij's flagship as obliged her to bear up.
The Venerable then ranged along the lee side of the Vrijhieid, while the Ardent engaged the same vessel from windward. A little later, the Triumph got into close action with the Wassenaar, and the Bedford with the Admiraal Tjerk Hiddes De Vries and the Hercules. The last named presently took fire; and, although the flames were promptly extinguished, the danger was at one moment so great that she had to throw all her powder overboard. In the meantime she had lost her mizen mast; and, having no means of defence, she struck.
In her encounter with the Wassenaar the Triumph experienced no interruption; and she shortly compelled that vessel to surrender. (The Wassenaar, after striking, was fired at by a Dutch brig, which induced her to rehoist her colours; but she struck again later to the Russell) She then passed ahead towards the Vrijheid, which, though terribly mauled, was still firing, and which, indeed, distantly assisted by ships from the rear, had compelled the Venerable to haul off and wear round on the starboard tack.

Not, until De Winter's flagship had defended herself long and bravely, and, losing all her masts, had had her starboard battery put out of action by their fall, did she haul down her colours. She seems to have struck at about the same moment as the Jupiter; and, with the surrender of these two flagships, the action ceased.
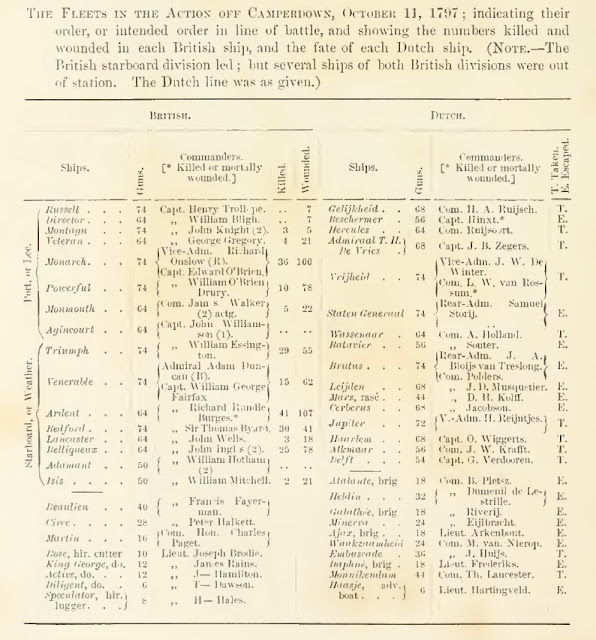
The British were then masters of seven ships of the line, two 50's, and two frigates, (Vrijheid, Jupiter, Gelijkheid, Admiraal De Vries, Haarlem, Hercules, Wassenaar, Alkmaar, Delft, Monnikendam, and Embuscade. or more than half the strength of the Dutch fleet). To attempt to pursue the rest was out of the question, for Duncan was already in but nine fathoms, and the low land, between Kamperduin and Egmond, was only five miles off.'
 |
| An illustration from the London Gazette October 16th 1797 showing the position of the battle, together with details of the fleets engaged, and shows well the proximity of the battle to the Dutch coast. |
Rear-admiral Sturges Jackson in 'Logs of the Great Sea Fights 1794-1805', from where the log accounts are taken, states the following in his assessment of the battle;
'The signal logs of the Venerable and Monarch give on the whole a fair account of the method of attack carried out by Admiral Duncan, but there is one point of considerable importance as to which the two records differ. It will be noticed that according to the signal log of the Venerable the following general signals were made immediately before the fleet bore down on the Dutch:
11.8 Form starboard line of bearing.
11. 11. Come to the wind together on the starboard tack.
11.17. Prepare to take stations in the line as pennants are shown.
11.30. Each ship to engage her opponent.
11.35. Bear up and sail large.
11.40. The van to attack the enemy's rear.
11.53. Pass through the line and engage the enemy to leeward.
These signals are also noted in the signal log of the Monarch, with one important addition: after the
signal for the van or lee division to attack the enemy's rear, appears a signal for the weather division to engage the centre of the enemy. If then the Monarch's log were to be accepted as correct, it would appear that Duncan after forming, or attempting to form, a line parallel to that of the enemy, and twelve minutes after making the signal for each ship to engage her opponent, had changed his plan of attack and determined to throw his whole force on the centre and rear of the Dutch fleet. In other words, that eight years before Trafalgar he had exactly carried out Nelson's tactics on that occasion.'
The parallels to be drawn between the battles of Camperdown and Trafalgar are very obvious, but not
so definite as at first thought with several clear distinctions between the ways Duncan and Nelson fought their battles, with Nelson's very clearly determined plan of battle, designed to concentrate his fleet to take out the enemy centre and rear before their van could recover and come to their aid, and eloquently mapped out to his captains in his usual style of inclusive and delegated command, carried out pretty much in the way he envisaged.
 |
| As mentioned in my post looking at Onslow's flagship Monarch and the signals from Lord Howe's 1795 Signal Book, The log of Venerable shows her signalling to the fleet at 12.5 for Close Action, which, as stated in the signal book, Signal No.5 with a red pennant flown over it. Most paintings of Venerable only show her flying Signal No. 5 as does my model, but Derek Gardner got it more correct in his depiction of Venerable (inset) from the header to this post, in close action with Vrijheid with the red pennant clearly seen. |
Duncan on the other hand was seemingly more the case of improvisation on the spot, intending to fight a Howe style of breaking the line as at Glorious First of June, but when he realised the Batavian fleet was edging towards the shallows and the necessity to throw caution to the wind immediately ordering his fleet to bear down and pass through the enemy, to engage at close range in response.
The fact that the Leeward Division was able to close with and overwhelm the Batavian rear in the way that they did before coming up to support Duncan and the Windward Division was a happy and fortunate occurrence rather than a predetermined attack plan.
Sturges Jackson goes on to quote Duncan's post-battle despatch and his own summing up to highlight this point;
' As we approached near, I made the signal to shorten sail in order to connect them; soon after I saw the land between Camperdown and Egmond about 9 miles to leeward of the enemy and, finding there was no time to be lost in making the attack, I made the signal to bear up, break the enemy's line and engage them to leeward, each ship her opponent; by which I got between them and the land whither they were fast approaching.'
The concentration on the Dutch rear was thus wholly accidental, but its effect was most important. The four sternmost ships of the enemy's fleet were quickly overwhelmed, while the losses in men and material of the eight British ships which engaged them were comparatively small.
As well as the account by Clowes of the action taken by Venerable and the other British 74's in the Windward Division, I have included here, as with my other posts looking at other British ships involved in the battle, the logs from the ships featured here, alongside a timed interpretation of where those ships were during it, with as usual some being much more detailed than others.
Venerable
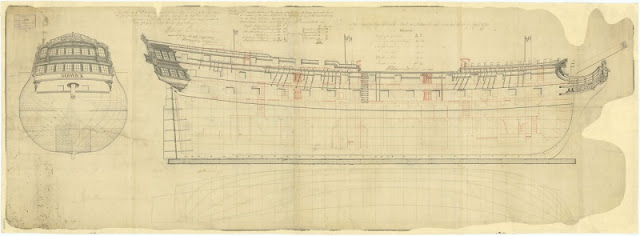
HMS Venerable was a 74-gun third-rate ship of the line of the Royal Navy, launched on the 19th April 1784 at Blackwall Yard, London.

 |
| Blackwall Yard from the Thames - Francis Holman The ship on the extreme left, with a covered barge under its bow, is probably the 'Venerable', 74 guns, which had been launched in April 1784. Of the five ships on the stocks in the right-hand half of the picture, the first and third from the right are merchantmen: the other three are 74-gun naval two-deckers that Perry built under contract. They have been identified, probably in this order, left to right, based on launch date as the 'Theseus' (September 1786, and here still under construction), the 'Victorious' (with flagmasts already fitted for her launch in April 1785) and the 'Hannibal' (April 1786). |
Her general characteristics were:
Tons burthen 1669 tons (bm)
Length of gundeck 170 feet
Beam 47 feet, 2 inches
Depth of hold 19 feet, 11 inches

Her armament consisted of:
Gundeck: 28 x 32-pounder long guns
Upper Gundeck: 28 x 18-pounder long guns
Quarterdeck & Forecastle: 14 (QD) & 4 (Fc) x 9-pounders long guns
 |
| Admiral Duncan's blue flag, nailed up later by seaman Jack Crawford is flying from the mainmast |
In 1795, Venerable is known to have been under the command of Captain James Bissett.
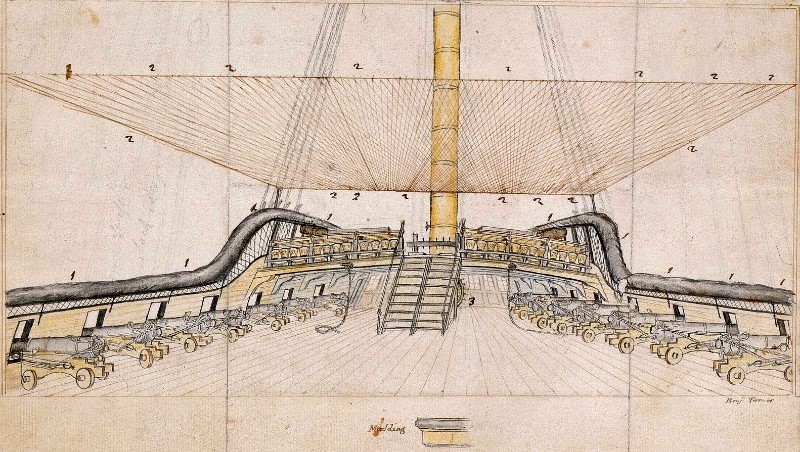 |
| A sketch of the quarterdeck and poop of HMS Venerable circa 1799, showing a splinter-net or “sauve tête” rigged, designed to provide protection from falling debris. Such netting became standard in the Royal Navy from 1793, whilst anti-boarding netting slightly later from 1795. |
In 1797, Venerable served as Admiral Duncan's flagship at the Battle of Camperdown and was under the command of Captain William George Fairfax.
 |
| Vice-Admiral Sir William Fairfax, (1739-1813) circa 1798 by William Grimaldi |
Sturges Jackson makes the following comment in his record of the master's log from HMS Venerable during the battle;
'The following log is taken from the copies of the logs of the ships engaged in the battle of Camperdown found in Vol. IV. of the Admirals' Journals at the Record Office.
Poor as this account of the action is, it is better than the remarks contained in the so-called Master's log-book, which in this case is a very badly kept journal, the tabular portion of the log being omitted. The Venerable took a most distinguished part in the action. She engaged to leeward of the Vrijheid, and while in that position received the fire of the Staten Generaal on the starboard side, the de Vries ahead and the Wassenaer astern.'
Log. G. PATTERSON, Master. Admirals' Journals, Vol. IV

The so called log book of Venerable is indeed short on detail and so I have included screen shots of the tabulated record of events that culminate in the flagship's contribution to winning the battle with the short summary shown below;
'The action commenced 40 minutes past 12 P.M., and ended at 3 P.M. Captured several of their ships
with their Admiral and Vice-Admiral.'
 |
| Duncan was intending to break the line between Vrijheid and the next ship Staaten Generaal under Rear-Admiral Samuel Story. |
You can see this amazing model in the link below.
While the Dutch rear-guard was overwhelmed by British numbers, a more equal combat was contested in the north. There the combat was centred around the two flagships, Duncan's Venerable engaging De Winter's Vrijheid, eighteen minutes after Monarch broke the line to the south.

Shortly afterwards, the battered Wassenaar with Captain Holland dead on his quarterdeck surrendered to Triumph.

Following Onslow's victory over the Dutch rear-guard, the admiral ordered the least damaged of his ships to sail in support of the outnumbered British ships in the melee with the Dutch van. Powerful and Director were the quickest to respond, joining the attack on Vrijheid at 14:00.
For an hour De Winter continued his resistance, with Director holding station off the stern of Vrijheid and repeatedly raking it. By 15:00, all three masts had been brought down, obstructing the fire of the starboard battery, while De Winter was the only officer who remained uninjured, standing on his wrecked quarterdeck and still refusing to lower his colours.
 |
| Signal No. 5 'Engage the Enemy' flies from the mizzen |
Duncan had originally intended to break the line between Vrijheid and the next ship Staaten Generaal under Rear-Admiral Samuel Story, but Story ensured that there was no gap between his vessel and the flagship to break through, and their combined fire was so dangerous to the advancing Venerable that Duncan instead cut through behind Staaten Generaal, raking Story's ship twice and causing it to drift off in confusion as Duncan engaged Vrijheid from the east.
 |
| The final rather underwhelming entry in Venerable's log; 'The action commenced 40 minutes past 12 P.M., and ended at 3 P.M. Captured several of their ships with their Admiral and Vice-Admiral.' |
Within a short period however both Venerable and Ardent were surrounded, as at least one of the frigates from the second line joined the attack on the two isolated British vessels. At the height of the combat, the colours and signal flags on Venerable were brought down by cannon fire.
 |
During the Battle of Camperdown in 1797 Admiral Duncan's blue squadronal flag was several times shot away from the main topmast of his flagship, 'Venerable'. When the topmast itself came down, one of his seamen, 'Jack' Crawford of Sunderland, went aloft and this time nailed the colours to the shattered stump, thereby establishing himself as a popular hero, and also a popular English phrase derived from British naval history, 'to nail ones colours to the mast' meaning to declare a position taken by the individual, clearly and without equivocation. |
To ensure that there was no suggestion that the flagship had surrendered, a sailor named Jack Crawford scrambled to the top of the mainmast and replaced them as the battle raged beneath him.

The British flagship was soon isolated in the midst of the Dutch van, engaging Vrijheid, Staaten General, Admiral Tjerk Hiddes De Vries and Wassenaar simultaneously. Despite the heavy odds Duncan continued to fight hard, the British succeeded in knocking out two opponents by wounding Captain Dooitze Eelkes Hinxt of Beschermer, which drifted eastwards in confusion, while shots from either Bedford or Triumph set a powder barrel on Hercules on fire. The blaze on the latter ship, which soon spread to the sails and rigging, prompted a lull in the battle as the crew of Hercules desperately attempted to extinguish the blaze and other Dutch ships scrambled to escape the burning vessel as it drifted through the melee.
 |
| Venerable in the thick of it with prior to the arrival of the Powerful, Bedford and Triumph, her surrounded by four enemy third-rates, Vrijheid, Wassenaer, De Vries and Staten Generaal. |
Shortly afterwards, the battered Wassenaar with Captain Holland dead on his quarterdeck surrendered to Triumph.
Triumph then moved on towards the battle between Vrijheid and Venerable, at which time the crew of Wassenaar raised their colours again after being fired on by a Dutch brig.

Russell, driving northwards to join the attack, encountered the now extinguished Hercules, whose crew had thrown all of their ammunition overboard during the fire to prevent the ship exploding. The ship was thus defenceless, Commander Ruijsoort surrendering immediately.
When British sailors from Director boarded the drifting flagship, De Winter was discovered assisting the carpenter with repairs to the barge with his intention to shift his flag to another ship. On being informed that he was a prisoner of war, he replied "This is my destiny not foreseen" and, after checking on a mortally wounded officer who lay on the quarterdeck, he followed the boarding party back to their boat for the trip to Venerable.
_RMG_J3032.jpg)


Observed several ships struck and some dismasted. At 4, employed knotting and splicing. Got down main and mizen topgallant masts and yards, cross-jack and mizen topsail yards. Struck mizen topmast to secure mizen mast. Sent an officer and men on board Hercules which had been on fire. Brought on board the officers and prisoners. At 5, Camperdown SE 4 leagues. Found 3 1/2 feet water in hold. Rigging masts and yards much wounded, 3 guns and 7 carriages disabled. At 8, light breeze and fair. Shifted the topsails.


 |
| Duncan Receiving the Surrender of De Winter at the Battle of Camperdown, 11 October 1797 - Daniel Orme |
HMS Venerable suffered 77 casualties in the battle of whom 15 were killed, with the ship described as being very badly damaged in the hull and masts.
Triumph
HMS Triumph was a 74-gun third-rate ship of the line of the Royal Navy, launched on the 3rd March 1764 at Woolwich Dockyard, London.
 |
| H.M. Ship Triumph and Squadron off the Pointe du Raz 1808 - Mark Myers |
Her general characteristics were:
Tons burthen 1826 tons (bm)
Length of gundeck 171 feet, 3 inches
Beam 49 feet, 9 inches
Depth of hold 21 feet, 3 inches
 |
| Woolwich Dockyard (Nicholas Pocock, 1790, National Maritime Museum). The surviving Clock House (then newly built) is seen centre-right, and the Parish Church far left. Left to right along the shoreline: three shipbuilding slips (two of which survive, much rebuilt, at Mast Quay), two dry docks (which also survive, much rebuilt) and a further slip (since filled in). Behind the latter stands the large Sail and Mould Loft of 1740, with the Great Storehouse to its right and the Officers' Terrace (houses with gardens) to the right of that; all these were demolished in the early 20th century. |
_RMG_J3032.jpg)
Her armament consisted of:
Gundeck: 28 x 32-pounder long guns
Upper Gundeck: 30 x 18-pounder long guns
Quarterdeck & Forecastle: 14 (QD) & 2 (Fc) x 9-pounders long guns.

At Camperdown, HMS Triumph was under the command of Captain William Essington.
 |
| Vice-Admiral Sir William Essington, by John James Halls, 1809 |
The following account of the Battle of Camperdown was recorded by Triumph's master, James Read;
Log. JAMES READ, Master. Official No. 3081.
October 11th.
A.M. 21 sail bearing S by W, standing on larboard tack under easy sail. Made all sail per signal for general chase. 1\4 past 11 , shortened sail occasionally. Moderate and cloudy with showers, rain.

P.M. 1\2 past 12, Admiral Onslow began to engage the centre. About 1, Admiral Duncan engaged the van. We soon after fell in between two ships.

About 2, much cut up. Ship on larboard side sheered off, came up a fresh ship.

1\2 past 2, wheel shot away. Observed a Dutch ship on fire. Squally with rain.


At 3, wind shifted. Paid her head round to southward. Saw the land. 1\4 past 3, wore. Sounded in 9 fathoms and hauled on starboard tack. The action ceased.

Observed several ships struck and some dismasted. At 4, employed knotting and splicing. Got down main and mizen topgallant masts and yards, cross-jack and mizen topsail yards. Struck mizen topmast to secure mizen mast. Sent an officer and men on board Hercules which had been on fire. Brought on board the officers and prisoners. At 5, Camperdown SE 4 leagues. Found 3 1/2 feet water in hold. Rigging masts and yards much wounded, 3 guns and 7 carriages disabled. At 8, light breeze and fair. Shifted the topsails.

October 12th.
A.M.
Do. weather. Employed as before. Kept 1 hand pump going. Got down fore topgallant mast and yard. Mustered ship's company. Found 30 men killed, 75 wounded. Bent another mainsail. Carpenters employed stopping shot holes, and making a platform for the wounded in gun-room.
HMS Triumph's casualties amounted to 84 of whom 29 were killed and her damage described as being hull and masts damaged and ten guns dismounted.
Bedford
HMS Bedford was a Royal Oak Class 74-gun third-rate ship of the line of the Royal Navy, launched on the 12th October 1768 at Woolwich Dockyard, London.

Her general characteristics were:
Tons burthen 1606 tons (bm)
Length of gundeck 168 feet, 6 inches
Beam 46 feet, 9 inches
Depth of hold 20 feet

Her armament consisted of:
Gundeck: 28 x 32-pounder long guns
Upper Gundeck: 28 x 18-pounder long guns
Quarterdeck & Forecastle: 14 (QD) & 4 (Fc) x 9-pounders long guns

Log. THOS. BYARD, Captain. Official No. 2393.
October 11th.
A.M.
 |
| Captain Sir Thomas Byard |
At 7, Admiral made signal to Triumph to look out NW 1/2 W. 1/4 after 7, tacked per signal.
1\2 past, Admiral made signal for 3 strange sail. Joined the Russell and squadron. Saw the Dutch fleet to the southward on the larboard tack in the line of battle.

1/4 past 10, Admiral made signal to bear up. Set topgallant sails. At 1/2 past 10, out 2nd reefs and set studdingsails. Made all sail. At 1 1, shortened sail. In 2nd reefs topsails. Texel ESE 5 leagues. Fresh breezes and cloudy with rain.

P.M.
At 1/2 past 12, passed the enemy's fifth ship in the van and began to engage the fourth. 40 minutes past 12, Admiral made signal to engage close. 55 minutes past 2, signal No. 101.

Continued engaging till 3, at which time two of the enemy's ships struck abreast of us. 10 minutes past 3, signal No. 10. 43 minutes past 3, signal No. 83. 10 minutes past 4, Bedford's to chase NE.

At 5, Texel ESE 4 leagues. 5 minutes past 5, Bedford's signal to come to the wind on the larboard tack. A great number of men killed and wounded in the action. At 8, moderate and cloudy. Fleet and prizes in company. At 12, do. wind and weather.

HMS Bedford's casualties amounted to 71 of whom 30 were killed and her damage described as being very badly damaged in the hull and rigging.

Next up, the balance of the Windward Division with the three 64's Ardent, Belliqueux and Lancaster and the 50-gun Isis approaches completion with their fitting out and rigging next week.
In addition I have a book review to post following my reading of the new title from Helion Books, 'Suffren versus Hughes' by Quintin Barry and Carolyn and I have just got back from a little adventure in London where we visited the new exhibition at the British Museum, entitled 'Legion Life in the Roman Army' and I will post a full report on that visit; I also have three new 3D printed 1:700 ships to review and finally I'll be picking up where I left off in JJ's on Tour in Darwin with a post looking at the interior of that part of Australia and some of its very interesting inhabitants, so lots of stuff to talk about.
More anon
JJ